

Before you start pulling your room apart in a panic, let's talk about getting prepared. A proper bed bug inspection isn't just a frantic search—it's a methodical hunt, and every good hunter needs the right gear. Taking a few minutes to gather some simple tools is what separates a successful investigation from a wild goose chase.
Assembling Your Bed Bug Inspection Toolkit
Think of this less like cleaning and more like a crime scene investigation. You need to get into dark, tight spaces, peer into tiny crevices, and safely collect any evidence you uncover. If you go in unprepared, you’re not only less likely to find these expert hiders, but you might even spread them to other rooms without realizing it.
You wouldn't see a detective show up to a crime scene empty-handed, right? Same idea here. Getting your tools ready first means you can stay focused on the search without stopping to rummage through a junk drawer, keeping the whole process clean and contained.
Essential Gear for Your Search
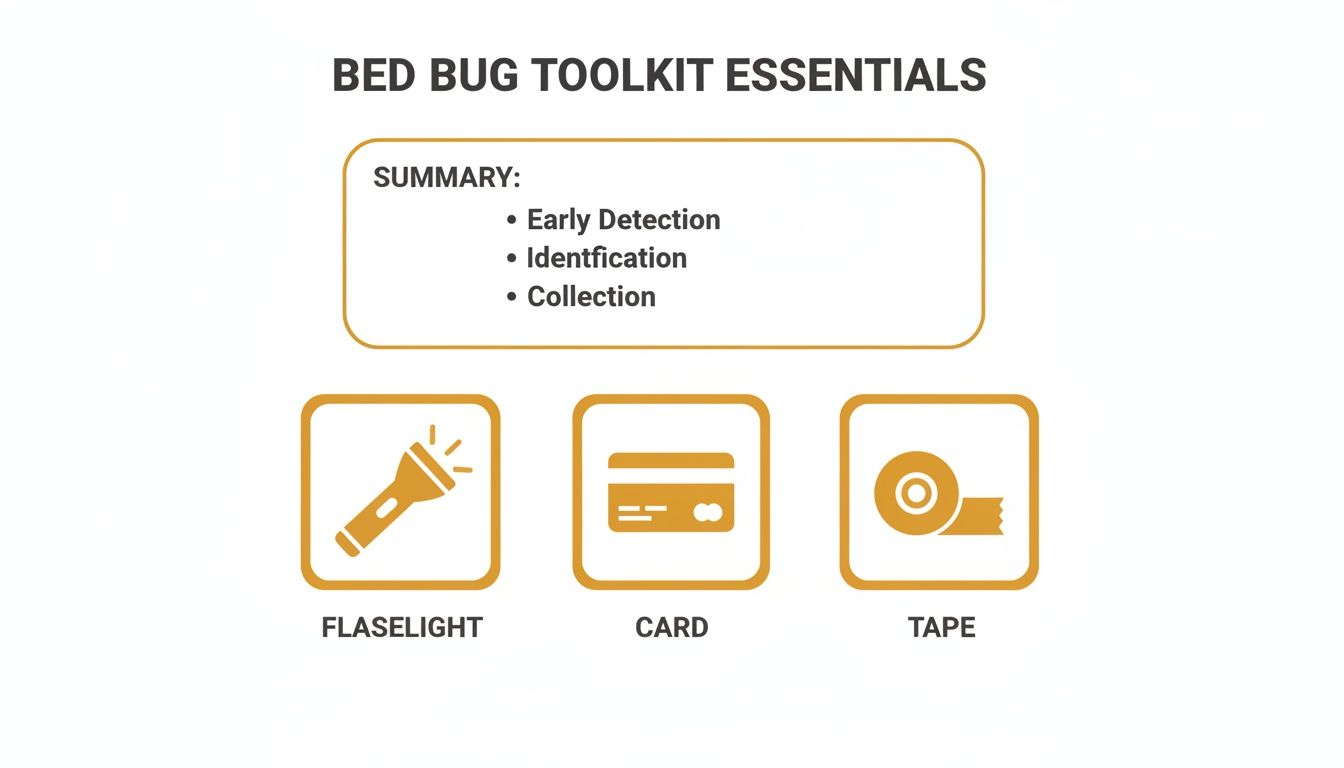
The good news is you probably have most of what you need lying around the house. The trick is to get it all in one spot before you start. Here’s a quick checklist of what you’ll want to have on hand:
- A Bright LED Flashlight: Your phone's light just won't cut it. You need a powerful, focused beam to really light up the dark corners and deep cracks where bed bugs love to hide.
- A Magnifying Glass: Bed bug eggs and newly hatched nymphs are incredibly small—we're talking the size of a pinhead. A magnifier is key to confirming whether that tiny speck is just dust or something more sinister.
- An Old Credit Card or Thin Plastic Card: This is your secret weapon for getting into tight spots. You can slide it along mattress seams, into furniture joints, and behind baseboards to flush out anything hiding inside.
- Clear Sticky Tape: Found a live bug? Perfect. Use a piece of clear tape to gently press over it. This traps the bug without squishing it, making it much easier to identify later.
- Sealable Plastic Bags or Vials: If you find anything—live bugs, shed skins, even dark spots that look suspicious—you need to contain it. Sealing your evidence in a bag prevents it from spreading and gives you a physical sample to show a professional.
- Disposable Gloves: It’s a simple step, but wearing gloves protects your hands and stops you from accidentally carrying bugs or eggs to another part of your house.
A methodical approach is everything. By preparing your toolkit, you are setting the stage for a thorough inspection that yields clear results, which is a critical step detailed in any professional pest management manual.
Once you’ve gathered these items, you’re officially ready to move from prep to action. This simple setup allows you to conduct a search with the same initial diligence as a professional, ensuring no stone is left unturned. For a deeper dive into professional-grade strategies, our complete pest management manual offers more advanced guidance.
Identifying the Key Signs of Bed Bugs
Spotting a bed bug problem is about more than just seeing a live bug. These pests are incredibly sneaky and leave behind a trail of subtle clues. Knowing what to look for is the first real step in figuring out if you have an issue. It’s all about learning to read the signs they leave on your sheets, mattress, and furniture.
When you start your search, you're looking for the entire lifecycle—not just the adults. You have to train your eye to spot everything from their nearly invisible eggs to the mature, apple-seed-sized bugs. It's the smaller, less obvious signs that people often miss, which is exactly how a small problem can quietly grow into a full-blown infestation.
Physical Evidence Left Behind
The most obvious signs are almost always on or right around the bed. Start by carefully stripping your bedding, layer by layer, and examining each piece under a bright light.
- Dark Fecal Spots: Look for small, dark specks that look like someone dotted the fabric with a black marker. This is bed bug droppings. The dead giveaway is that these spots will smear if you wipe them with a damp cloth, leaving a reddish-brown streak from the digested blood.
- Rust-Coloured or Reddish Stains: Keep an eye out for tiny rust-coloured or reddish spots on your sheets. These are often caused by a bed bug being crushed after feeding. If you find stains like these, this guide on removing blood from sheets can help you clean them up.
- Shed Skins (Casings): As bed bugs grow, they shed their exoskeletons. These casings look like hollowed-out, translucent versions of the bugs themselves. Finding these is a definite sign of an active, growing population.
- Eggs and Eggshells: Bed bug eggs are tiny (about 1 mm), pearly white, and usually laid in clusters tucked away in seams and crevices. Honestly, they’re almost impossible to see without a magnifying glass.
To make your search easier, grab a flashlight, an old credit card to check seams, and some tape to pick up any samples you find.
These simple household items can turn a quick look into a proper investigation, helping you find evidence hidden in the tightest spaces.
To help you sort through what you're seeing, I've put together a quick reference table. It breaks down the common signs, what they look like, and what they really mean.
Bed Bug Evidence Identification Guide
| Sign of Infestation | Visual Description | Common Locations | What It Means |
|---|---|---|---|
| Fecal Spots | Small, black or dark brown specks; may smear reddish-brown if wet. | Mattress seams, box spring, headboard, along baseboards. | Bed bugs have been feeding and digesting blood nearby. |
| Blood Stains | Small, rust-coloured or reddish smears or spots on bedding. | Sheets, pillowcases, mattress. | A fed bed bug was likely crushed, or a bite continued to bleed. |
| Shed Skins | Translucent, hollow, bug-shaped casings. | In mattress tufts, along seams, behind headboards, in furniture joints. | An active infestation with growing nymphs. |
| Eggs & Eggshells | Tiny (1 mm), pearly white, oval-shaped; often in clusters. | Tucked into fabric seams, screw holes, wood crevices, carpet edges. | A breeding population is present; the infestation is established. |
| Live Bugs | Reddish-brown, flat, oval adults (~5 mm); tiny, translucent nymphs. | Hiding in cracks and crevices near the sleeping area. | Definitive proof of an active infestation. |
Hopefully, this table makes it a bit easier to connect the dots and understand the evidence you uncover during your inspection.
Spotting Live Bed Bugs
Finding a live bug is, of course, the clearest confirmation you can get. Adult bed bugs are typically reddish-brown, flat, and oval, but they get more swollen and long after they’ve had a blood meal. The immature ones, called nymphs, are smaller and can be almost transparent, which makes them incredibly tough to spot. For a good visual comparison, check out our guide on what do bed bugs look like. It’ll help you tell them apart from other common household pests.
Keep in mind that bed bugs are nocturnal. During the day, they retreat into hiding spots close to where people rest, which is why your inspection has to be so incredibly thorough.
In our experience, most bed bugs are found within a few feet of sleeping areas. This is why it’s so critical to focus your search on the mattress, box spring, bed frame, and headboard. Pay special attention to any seams, tufts, or screw holes—these are their favourite hiding places.
Conducting a Thorough Room Inspection
Alright, you know what to look for. Now it's time to start the hunt. A successful inspection isn't a quick glance around the room; it requires a systematic, almost military-like precision. You have to get hands-on and methodical, starting at the epicentre of a potential infestation and working your way out. Bed bugs are absolute masters of concealment, so your job is to think like they do and leave no crevice unchecked.
Think of this process like peeling an onion. You’ll begin with the most likely hiding spots and gradually expand your search zone. The key is to move slowly and deliberately. If you rush, you can cause these tiny pests to scatter, which just makes your problem harder to track down.
Start with the Bed Itself
The vast majority of infestations begin on or right around the bed. This is where you need to focus 80-90% of your initial inspection time. Start by carefully stripping all the bedding—sheets, blankets, pillowcases. Put everything directly into a plastic bag that you can seal, ready to be laundered later on high heat.
With the bed bare, you can get down to the detailed work:
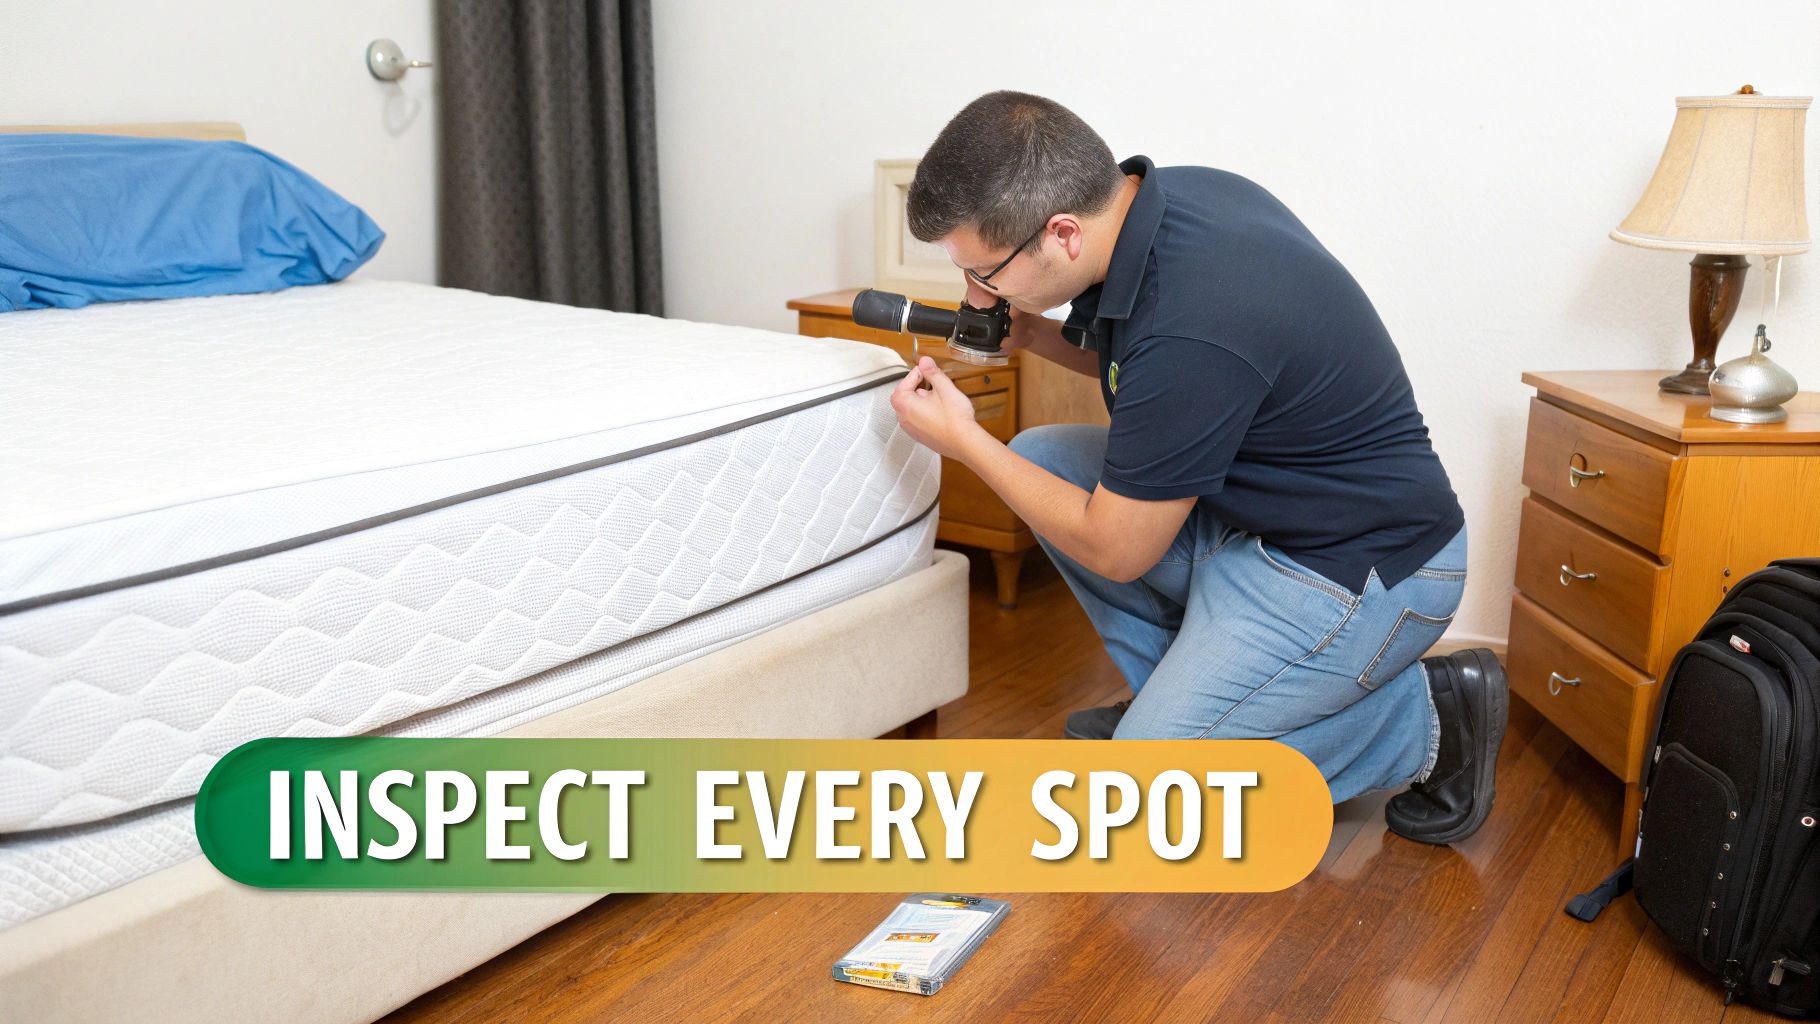
- The Mattress: Shine your flashlight along every single seam, tuft, and tag. Use your plastic card to scrape along the piping, trying to force anything hiding inside out into the open. Pay extra close attention to the corners where the seams meet.
- The Box Spring: This is a five-star hotel for bed bugs. Flip it over completely and rip off that thin fabric cover (the dust ruffle) stapled to the wooden frame. Inside, you'll find countless corners, joints, and dark spaces perfect for harbouring bugs.
- The Bed Frame and Headboard: If you can, take the bed frame apart. Check every joint, screw hole, and crack in the wood or metal. If your headboard is mounted to the wall, you need to carefully remove it and inspect both the back of it and the wall it was covering.
Bed bugs prefer to stay within a few feet of their food source—which is you. This is why a meticulous inspection of the mattress, box spring, and headboard is completely non-negotiable. Missing a single cluster of eggs here can lead to a full-blown re-infestation down the road.
Honestly, this is the most critical part of learning how to check for bed bugs. If you find evidence here, you’ve probably caught the problem relatively early.
Expand Your Search Outward
Once you've given the bed a thorough once-over, it's time to widen your search radius. As a bed bug population grows, they'll spread to nearby furniture, setting up secondary bases of operation.
Start with the items closest to the bed and work your way out from there:
- Bedside Tables and Dressers: Don't just look at them; empty them out. Pull out every drawer and inspect the inside corners, the joints, and the undersides. Shine your light into the dark recesses inside the furniture carcass.
- Upholstered Furniture: Any chairs, sofas, or ottomans in the room offer countless hiding spots. Check the cushions, all the seams, the skirts, and flip them over to inspect the frame underneath, just like you did with the mattress.
It really is like a ripple effect. The infestation starts at the bed and slowly spreads. Following this pattern helps ensure you’re looking where they are most likely to be at each stage.
Inspect the Overlooked Hiding Spots
When an infestation is well-established, bed bugs will venture even further into the room, seeking refuge in the most unexpected places. This is where most DIY inspections fall short and why problems can persist.
To make sure your search is complete, you have to check these often-ignored areas:
- Along Baseboards and Carpet Edges: Use your plastic card to gently pull the edge of the carpet away from the wall and inspect the tack strip underneath.
- Behind Wall Hangings: Take down picture frames, mirrors, and clocks. Check the backs of them and the wall space they were covering.
- In Electrical Outlets and Light Switches: Carefully unscrew the faceplates and shine your flashlight inside the electrical box. Be very cautious and avoid touching any wiring.
- Curtains and Drapes: Check the folds, seams, and hems of any window treatments. Don't forget the curtain rods and hardware, either.
- Books and Electronics: It sounds crazy, but even the spines of hardcover books or the vents on a clock radio can serve as a hiding spot for a desperate bug.
Finishing this kind of exhaustive room-by-room inspection gives you the clearest possible picture of the situation. You'll know not just if you have bed bugs, but also the likely scale of the problem you're facing.
Using Monitors and Traps for Confirmation
Sometimes, even after you’ve turned the room upside down, you come up empty-handed. It’s frustrating, but it happens all the time with new or low-level infestations where the signs are just too subtle to spot. If your gut is still telling you something’s not right, it’s time to switch from active searching to passive detection.
That’s where monitors and traps come in. These tools work around the clock, catching any bugs that are moving around while you're not looking. They offer a straightforward, non-invasive way to get the concrete proof you need when a visual check just isn't cutting it.
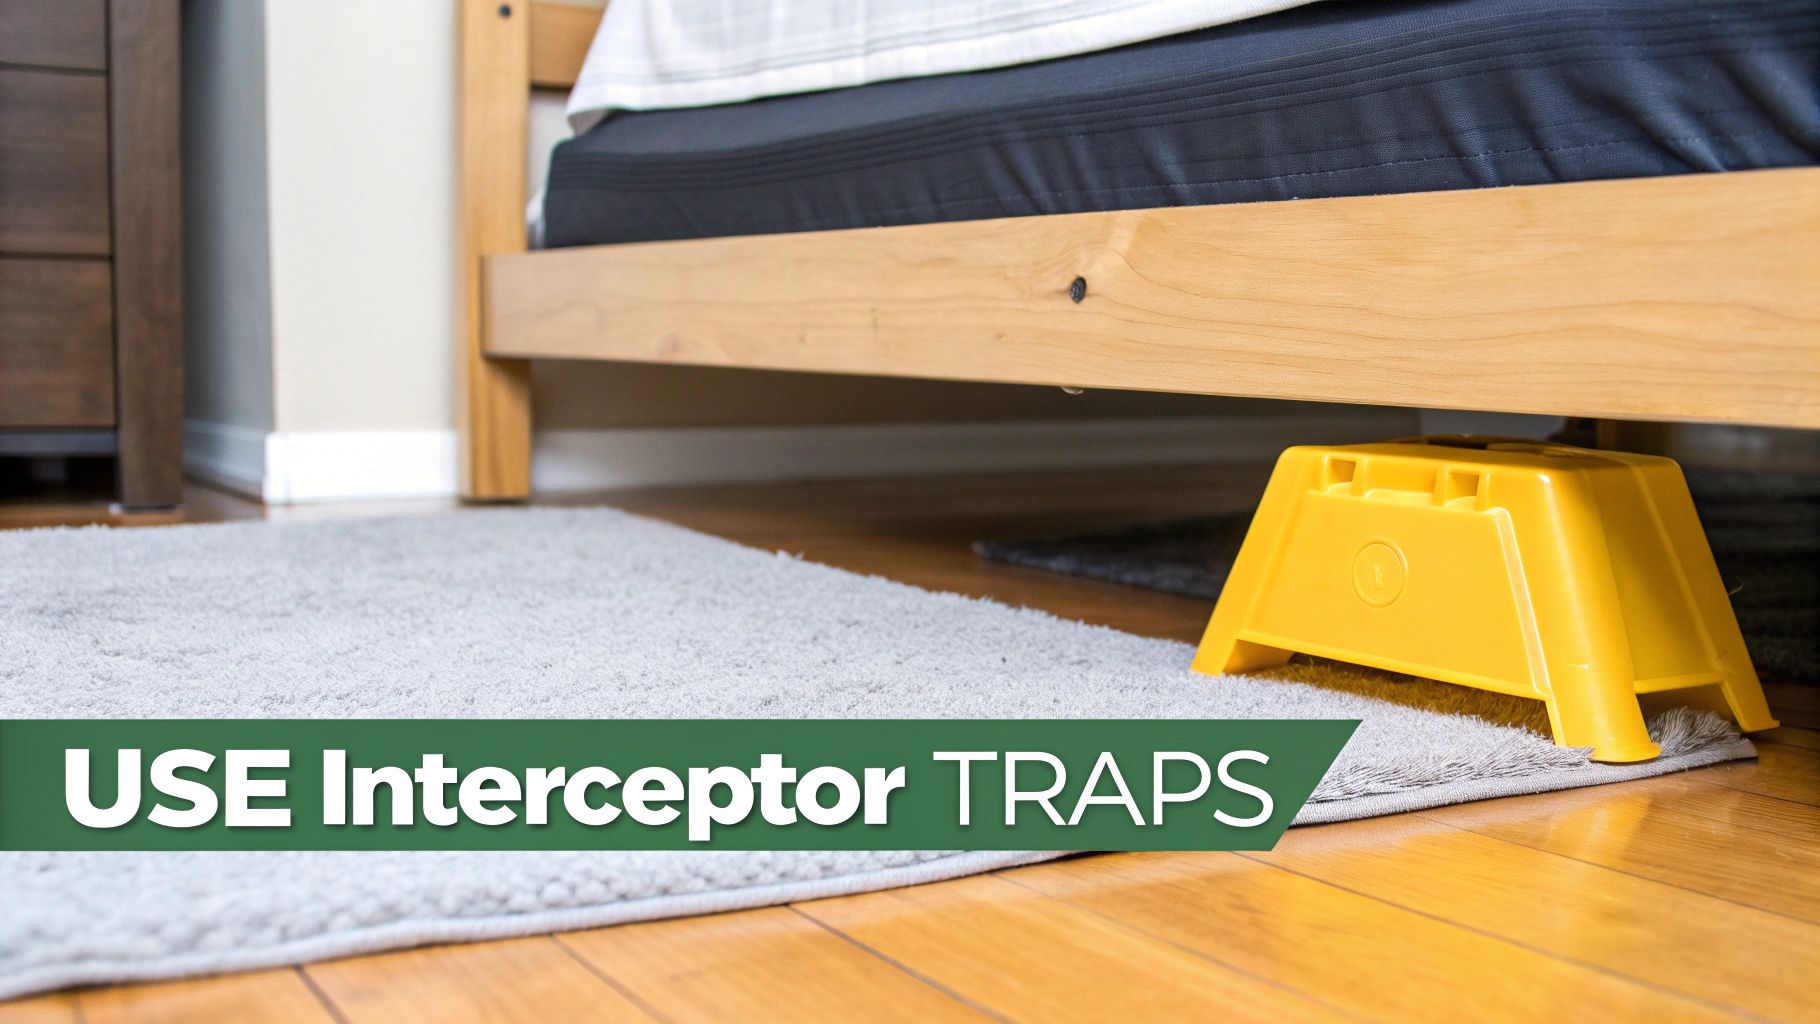
Leveraging Interceptor Traps
Interceptor traps are hands-down one of the most effective and affordable monitoring tools out there. They're simple plastic dishes designed to go under each leg of your bed, sofa, or other furniture.
The design is brilliantly simple. Bed bugs can easily climb the textured outer wall, but the inside has a smooth, slippery "moat" that they can't crawl out of. When they try to climb up the furniture legs to get a meal, they fall in and get stuck.
To make them work for you, you have to be methodical:
- Isolate the bed. Pull it away from the wall and make sure no bedding or dust ruffles touch the floor or any other furniture. This forces the bugs to take the only path available: up the legs.
- Place one interceptor under each leg. Make sure the leg is sitting squarely in the centre of the trap.
- Check them regularly. A quick peek with a flashlight once a week is all it takes. Finding even one bug is 100% confirmation that you have an active infestation.
Interceptors don't just confirm an infestation; they also give you clues about its size. Catching one or two bugs over a few weeks points to a light issue. Finding a dozen or more? You're likely dealing with a much more established problem.
Other Monitoring Options
While interceptors are a fantastic first line of defence, a few other types of monitors can help you zero in on the problem.
Passive Monitors: These are small, discreet devices—often with a sticky surface or a design that mimics a good hiding spot. You can tuck them into places that are hard to check, like between the mattress and box spring or behind the headboard. They work by catching any bugs that wander into them by chance.
Active Lures: These traps take it a step further. They use an attractant, like a tiny CO2 emitter or a chemical lure, to actively draw bed bugs out from their hiding spots. They're generally a bit pricier and often used by professionals to pinpoint hotspots, but they can give you answers much faster than passive methods.
Using these tools turns your one-time inspection into an ongoing surveillance mission. It’s a smart, low-effort way to catch a problem early and get the hard evidence you need to take action.
Your Action Plan After Finding Bed Bugs
Finding proof of bed bugs can send anyone into a panic, but what you do next is crucial. A calm, methodical response can stop a small problem from turning into a full-blown infestation. Before you do anything else, the first priority is to document everything.
Get your phone and take clear, well-lit pictures of any live bugs, dark fecal spots, or the shed skins you’ve discovered. If you can, use a piece of clear tape or a small, sealed container to carefully collect a sample. This evidence is gold for a professional, as it helps them confirm the pest and understand what they're up against.
Immediate Containment Steps
Now, you need to stop them from spreading. Whatever you do, don't start moving furniture, bags, or other items out of the room. This is one of the most common ways people accidentally move bed bugs to other parts of their home. Instead, your goal is to isolate and contain.
- Bag and Launder: Carefully strip all the bedding, nearby curtains, and any clothes in the area. Put everything directly into sealed plastic bags before carrying them to the laundry room.
- Turn Up the Heat: Wash the items in the hottest water the fabric can safely handle. Afterward, run everything through the dryer on the highest heat setting for at least 30 minutes. High heat is your best friend for killing bed bugs at every life stage, from egg to adult.
- Vacuum Everything: Grab a vacuum (ideally one with a HEPA filter) and go over the mattress, box spring, bed frame, and all the surrounding carpet and baseboards. As soon as you're done, empty the vacuum's contents into a bag, seal it tightly, and throw it in an outdoor trash bin immediately.
These first steps will help knock down the immediate population and keep the problem contained while you figure out a long-term treatment plan.
When to Call for Professional Help
Honestly, unless you found a single, lone bug on your luggage right after a trip, professional help is the smartest and most effective path forward. DIY treatments might kill a few visible bugs, but they almost always fail to reach the hidden clusters of eggs and nymphs tucked away in wall voids, behind baseboards, or deep inside your furniture.
A professional inspection from a service like Dragon Pest Control will pinpoint all the harborage areas, figure out the true scope of the infestation, and create a treatment plan that actually works. It's not just about killing the bugs you see; it's about eliminating the entire population you don't.
After the treatment is complete, a deep, thorough cleaning of the room is a great final step. A comprehensive cleaning can also help address potential allergy symptoms that can be triggered by the allergens bed bugs leave behind. Calling in the experts is the surest way to get a lasting solution and your peace of mind back.
Frequently Asked Questions About Bed Bug Inspections
Even after a thorough inspection, you're bound to have some questions. It's only natural. We've put together answers to some of the most common queries we get from homeowners here in Alberta to help you understand the situation and decide on your next steps.
Can I Have Bed Bugs Without Bites?
Yes, and it’s more common than you might think. A huge portion of the population—anywhere from 30-50%—doesn't have any physical reaction to bed bug bites. They can be bitten over and over without ever getting the telltale red, itchy welts.
This is exactly why you can't rely on bites alone to confirm an infestation. The only way to know for sure is to find the physical evidence: fecal spots, shed skins, or the bugs themselves. If you're curious, we have a whole guide on what do bed bug bites look like for those who do react.
How Did Bed Bugs Get Into My Clean Home?
This is a question we hear all the time, and it comes from a common myth. Let’s be clear: bed bugs have absolutely nothing to do with cleanliness. They are master hitchhikers, and an infestation is just a case of terrible luck.
They can latch onto belongings from almost anywhere:
- Hotels, motels, and Airbnbs
- Buses, trains, or airplanes
- Used furniture, mattresses, or clothing
- The luggage of a friend or family member who visited
A tidy, uncluttered home just makes it easier for us to find and treat them. But even the most spotless house won't stop them from catching a ride inside.
Bed bugs are equal-opportunity pests. They are found in five-star hotels and modest homes alike. Their only requirement is a reliable food source, making any home a potential target.
What Should I Do If I Find Just One Bed Bug?
Finding a single bug is a red flag that requires immediate, careful action. First things first: capture it. Use a piece of clear tape or trap it in a small, sealed container. Snap a clear photo so it can be properly identified.
While there's a slim chance it's a lone traveler that hasn't set up shop, it's far more likely to be a scout or proof of a larger, hidden group. Once you've secured the bug, you need to launch a full-scale, meticulous inspection of that room, paying extra attention to the bed and everything around it. Even if you don't find anything else, calling a professional for an expert opinion is the smartest move. It’s the only way to be certain you're not at the beginning of a much bigger nightmare.
Are Interceptor Traps Enough to Solve an Infestation?
No, not at all. Interceptor traps are fantastic monitoring tools, but they are not a treatment. They’re designed to do one thing: prove you have a problem and give you an idea of how bad it is by catching bugs moving to and from the bed.
They do absolutely nothing to kill the bugs breeding in your mattress, hiding in your furniture, or living inside your walls. Traps are a useful piece of the puzzle, but they have to be paired with a professional treatment plan to actually get rid of the infestation for good.
Don't let bed bugs take over your home and your peace of mind. If you've found evidence of an infestation, the next step is to call in the experts. The team at Dragon Pest Control offers professional, effective, and safe bed bug treatments across Red Deer and central Alberta. Contact us today for a free quote and take back your home.