
Before you even think about grabbing a can of wasp spray, your first and most important job is to play detective. A thorough, careful assessment is the absolute foundation of safe wasp nest removal. Rushing in without a clear plan is how simple problems become dangerous emergencies.
Think about it: a golf-ball-sized paper wasp nest under your deck railing is a completely different challenge than a basketball-sized yellowjacket colony hidden inside your soffit.
Assess the Nest Before You Act
Your evaluation starts with observation from a safe distance—the goal is to gather intel without provoking the nest's inhabitants. A crucial first step is a solid hazard identification to understand the real risks you're facing.
Identify the Wasp Species
Not all wasps are created equal, especially when it comes to temperament. In Alberta, you're most likely dealing with a few common types, and knowing who you're up against is key.
- Paper Wasps: These are relatively docile. Their nests are open-combed, looking a bit like an upside-down umbrella, and you'll often find them hanging from eaves, railings, or inside open pipes.
- Yellowjackets: Highly aggressive and territorial, yellowjackets are a significant threat. They build enclosed, papery nests that can be in wall voids, attics, or even underground in old rodent burrows.
- Hornets (like Bald-Faced Hornets): Technically a type of yellowjacket, these wasps are large, aggressive, and build those classic, big, grey, paper-like nests you often see hanging from tree branches.
Identifying the species immediately tells you the risk level. A paper wasp might leave you alone if you keep your distance, but getting too close to a yellowjacket nest will almost certainly trigger a defensive swarm.
Evaluate the Nest Size and Location
Next up are the nest's size and where it’s located. A small, new nest the size of a walnut is far more manageable than one that's been growing all summer. The location is just as important. A nest hanging from a tree branch far from your house is less of an immediate threat than one built right next to your front door or, worse, inside your walls.
This simple flowchart helps break down the key decision points when you find a wasp nest on your property.

The flowchart makes it clear: a 'no' to any safety check—whether it's the nest's size, a tricky location, or a personal allergy—means you should stop immediately and call a professional.
Consider the Time of Year
Timing your assessment can make a huge difference. Early spring is the best window for action. This is when you can inspect your property for small starter nests and get rid of them before the queen establishes a full colony.
Pest management experts often say these tiny, early-stage nests can just be knocked down during the day while the queen is out foraging. However, once a nest matures by mid-summer, professional help becomes the only safe option. As you get ready for the season, understanding how to manage other warm-weather pests effectively can give you a more complete protection plan for your home.
The single most important decision you'll make is whether to handle it yourself or call a professional. An honest assessment of the nest and your own limitations will always point you to the safest choice. Never attempt to remove a nest if you have a known allergy to stings.
Gearing Up for the Job
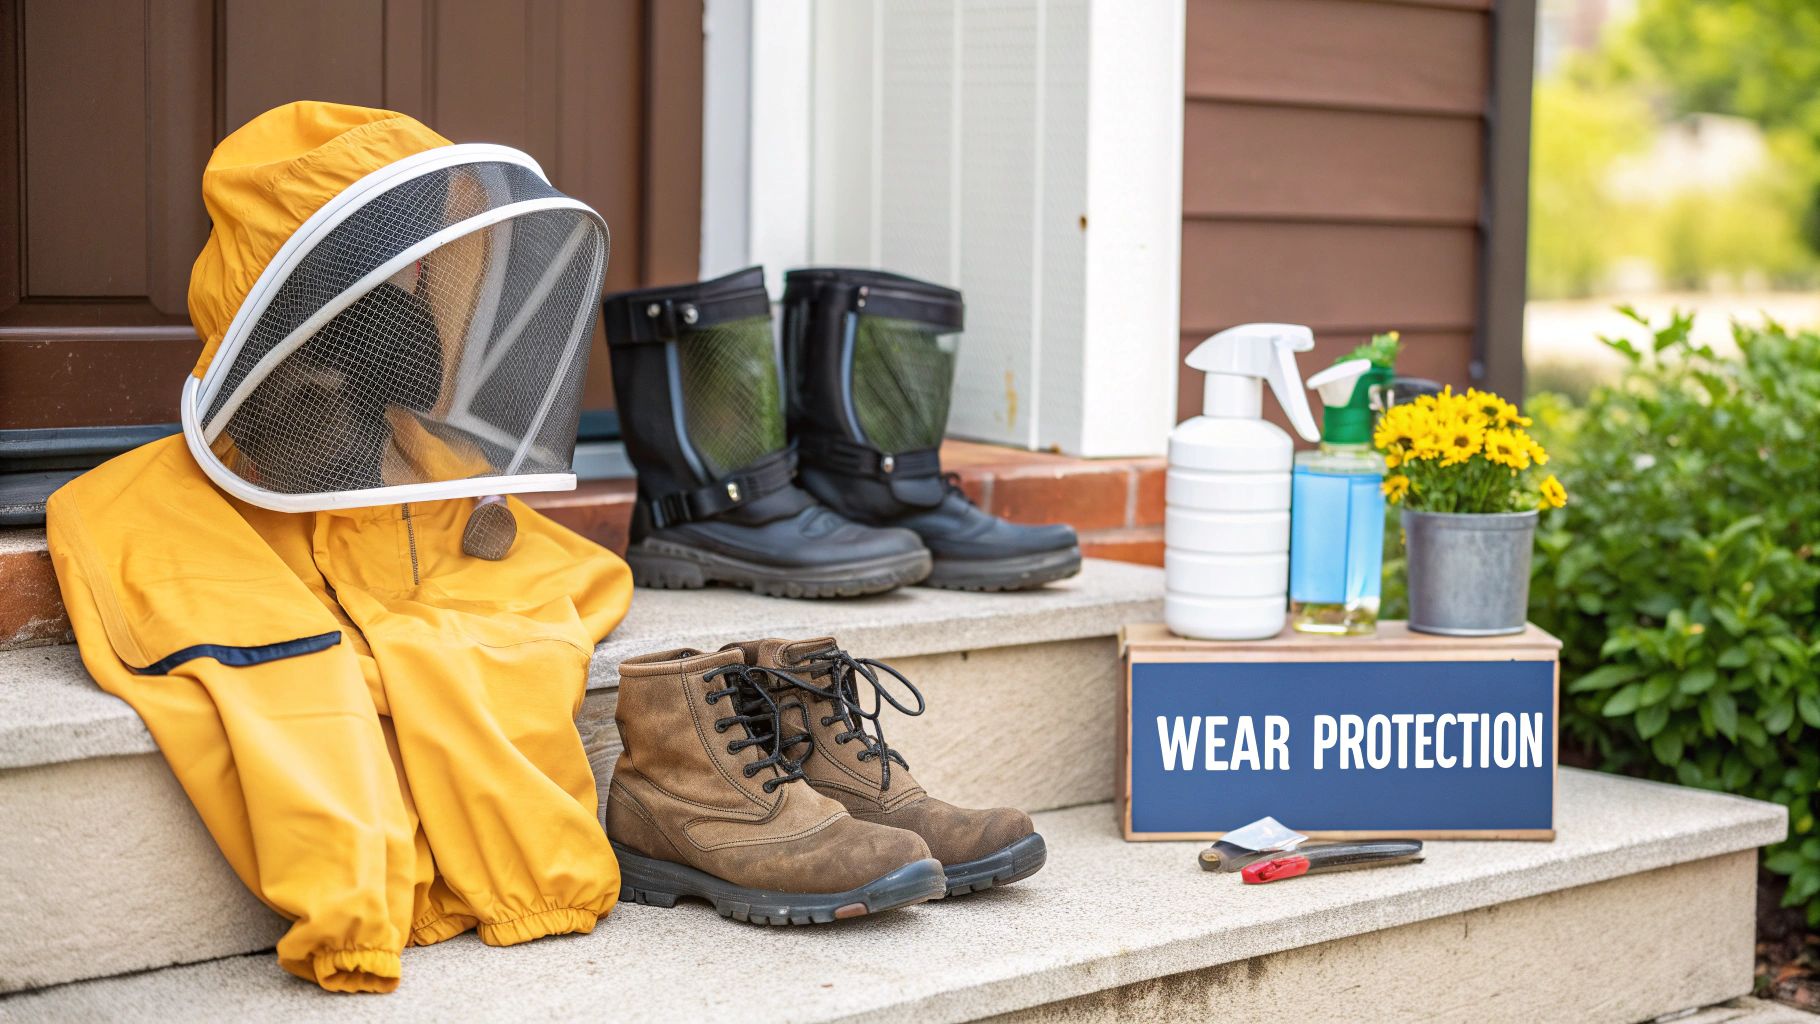
Alright, so you’ve decided the nest is within your DIY capabilities. The next, and most critical, step is gearing up. Your primary focus now is creating an impenetrable barrier between you and a very angry swarm of wasps.
Proper personal protective equipment (PPE) isn't just a friendly suggestion—it’s the single most important part of this whole process. This is no time for a hoodie and a prayer. A wasp's stinger is a tiny, efficient hypodermic needle, and your everyday clothes just won't cut it.
Assembling Your Protective Layers
You don't need to run out and buy a professional beekeeper's suit, though they are effective. You can create a surprisingly tough, sting-proof outfit with items you probably have lying around. The golden rule here is absolutely no exposed skin.
- Clothing: Think thick and loose. Layer up with a couple of long-sleeved shirts, and make sure the outer layer is something heavy-duty like a canvas work jacket or even a winter coat. Wear sturdy pants like thick denim jeans or work trousers. Tuck your shirt into your pants, and then tuck your pant legs into your boots. Every seam is a potential entry point.
- Footwear: Closed-toe boots are non-negotiable. Work boots or hiking boots are your best bet.
- Gloves: Grab the thickest pair of leather or rubber work gloves you have. They need to come up past your wrists. Make sure your sleeves are tucked securely inside the gloves to eliminate any gaps.
- Head & Face Protection: This is where wasps love to aim, so don't skimp here. A beekeeper's veil is the gold standard. In a pinch, you can fashion something similar with a wide-brimmed hat and some mosquito netting, secured tightly around your collar. At the very least, wear ski goggles and a thick face mask to protect your eyes, nose, and mouth.
Remember, wasps are notorious for targeting the face and neck area. Full head coverage is an absolute must if you want to walk away from this without a single sting.
Choosing the Right Wasp Removal Product
Once you're suited up, it's time to pick your weapon. Not all wasp killers are created equal, and the right one depends entirely on where that nest is located.
For nests hanging in the open—under an eave or from a tree branch—a good aerosol wasp spray is your go-to. Look for one that can shoot a solid stream for at least 4 to 6 metres. This distance is your friend. It lets you douse the nest's entrance from a safe vantage point, knocking down any guards and coating the entry so returning wasps get a dose.
If you're dealing with a nest hidden inside a wall void or a small hole in the ground, an insecticidal dust is usually far more effective. You'll need a puffer or duster to apply it. The goal is to get the powder right into the opening. The wasps do the rest of the work for you, tracking the dust deep into the nest as they come and go, which typically takes out the entire colony in a day or two.
Planning Your Attack and Your Escape
A successful removal isn't just about the takedown; it's about having a solid plan. Most importantly, you need a clear escape route.
Before you even think about approaching the nest, walk your retreat path. Is it clear of garden hoses, kids' toys, or uneven ground? You need to be able to back away quickly without looking down or tripping.
Get your family and any pets safely inside the house. The last thing you need is a dog or a curious toddler wandering into the danger zone. And be sure to close all the windows and doors to your house. A few stray, agitated wasps will have no problem finding their way inside if you give them a chance. This final check turns a risky gamble into a controlled, predictable procedure.
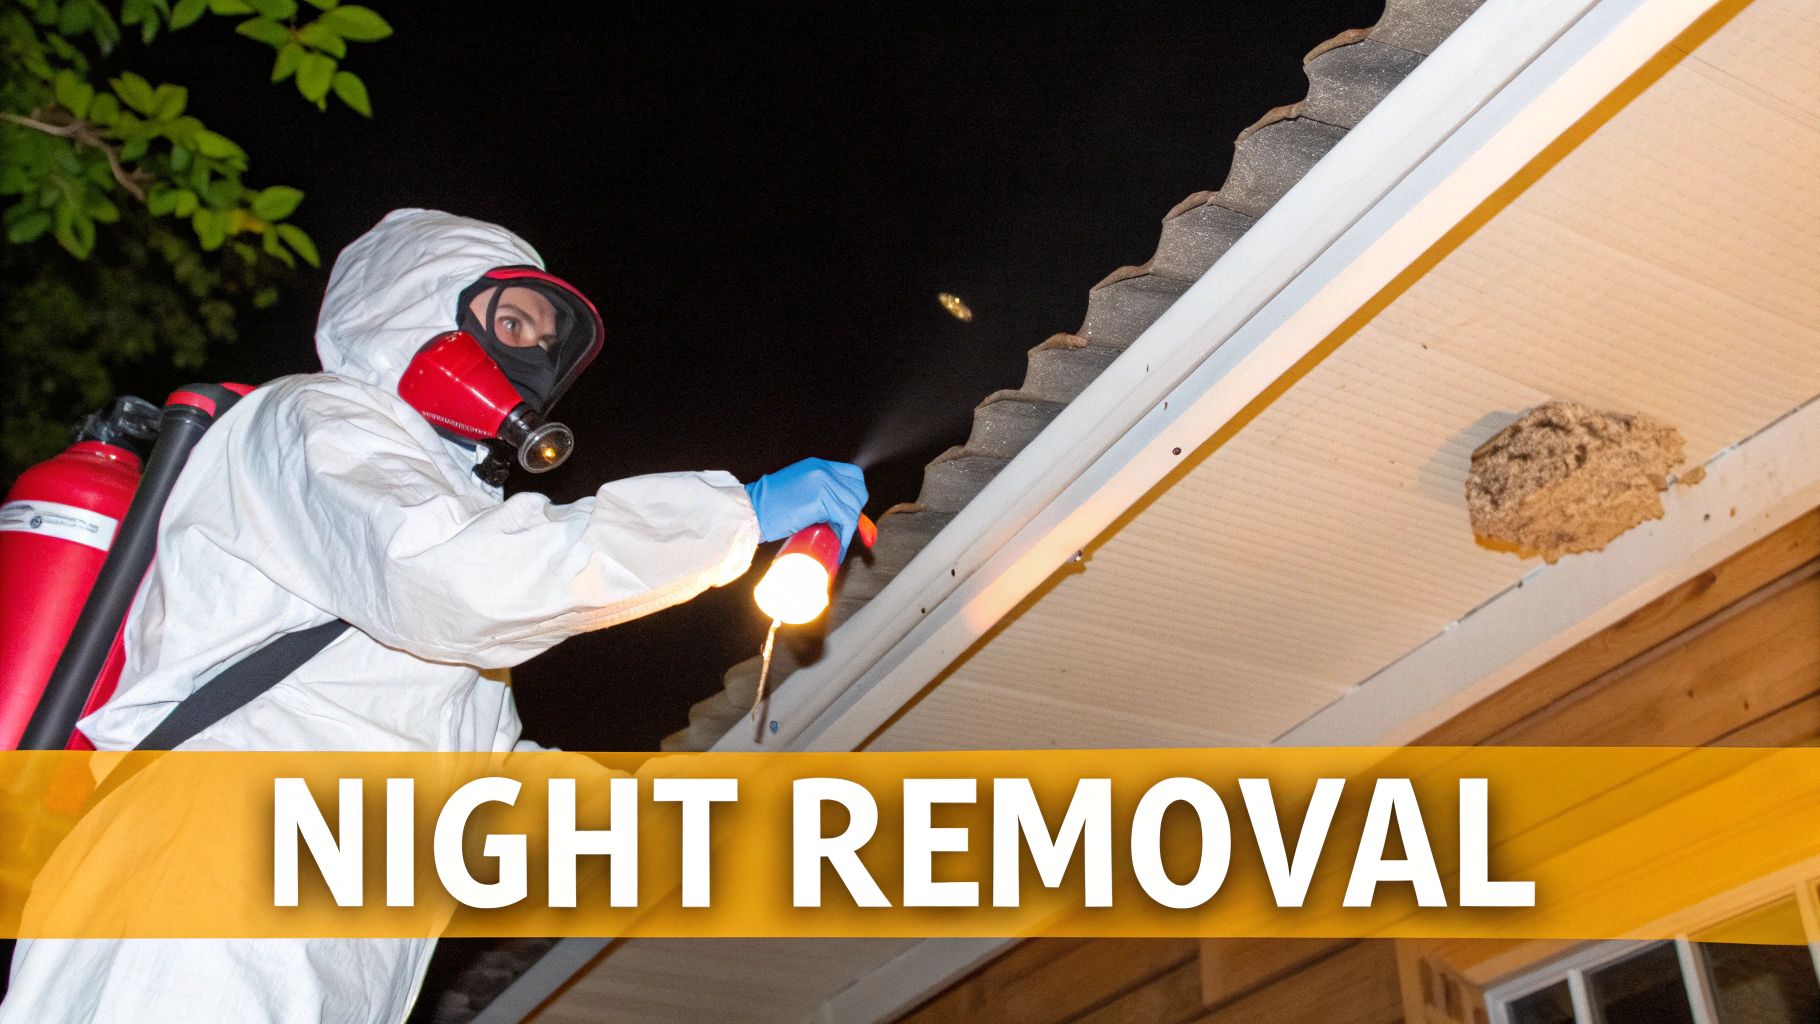
Executing a Safe Night-Time Removal
When it comes to getting rid of a wasp nest, timing is everything. Seriously. Your best bet is to wait until dusk, once temperatures start to drop. This is when wasps head back to the nest for the night and become much less aggressive. Acting during this window of calm turns a dangerous job into a much more manageable one.
I always recommend waiting at least two hours after the sun has fully set. This gives any stragglers a chance to return, ensuring you deal with the entire colony in one go and avoiding nasty surprises from foraging wasps coming back late.
The Right Light For A Stealthy Approach
Your biggest challenge at night is seeing what you're doing, but grabbing a standard flashlight is a huge mistake. That bright, white beam will instantly put the entire nest on high alert.
The trick is to use a red-light headlamp. Wasps can't really see light on the red end of the spectrum. To them, it's pretty much pitch black. This allows you to get right up to the nest without them ever knowing you're there. This one piece of gear is a game-changer for a successful removal.
Applying The Treatment Correctly
Okay, you've got your red light on and your escape route planned. Time to move in. Approach the nest slowly and without any sudden movements. If you’re using an aerosol spray, give it a good shake like the label says.
You want to aim for the nest's main entrance, which is usually a single hole at the bottom. Get into a position where you can spray a steady stream directly into that opening.
- Initial Blast: Point the nozzle right at the entrance and spray non-stop for at least 10-15 seconds. This takes out the guards and gets the product deep inside.
- Soak the Outside: Next, give the entire exterior of the nest a thorough coating. You want to completely saturate the papery material so the insecticide soaks through to every wasp inside.
- Get Out of There: Once it’s soaked, don't hang around. Back away calmly along your planned route and head straight inside.
You’re probably going to hear some angry buzzing from inside the nest as the treatment starts working. This is totally normal. Fight the urge to go back and spray again—let the product do its job.
Post-Treatment Patience And Observation
Your work isn't done just yet. The next 24 hours are all about watching from a safe distance. The insecticide needs time to circulate through the whole colony.
The next day, keep an eye on the nest. You're looking for any activity at all—wasps flying in or out. If you're still seeing live wasps after a full day has passed, you might need to do a second treatment, following the exact same night-time steps.
It's pretty common to see a few wasps that were out during the treatment return. Don't worry. As soon as they try to get back into the treated nest, they'll come into contact with the residual insecticide.
The Final Step: Knockdown And Disposal
Only when you are 100% sure all wasp activity has stopped for a good 24-48 hours should you even think about taking the nest down. And even then, you need to be careful and wear all your protective gear.
- Knock It Down: Use a long pole or a scraper to break the nest free. Have a heavy-duty garbage bag right underneath to catch it.
- Seal and Dispose: Immediately seal the bag up tight. I usually give the nest a good crush inside the bag just to be safe. Then, toss it in your secure garbage bin.
- Clean the Area: Scrape off any leftover nest material from the surface. This helps remove pheromones that could attract new wasps to build in the same spot next year.
Pulling off a night-time removal comes down to good prep and a lot of patience. By using the wasps' own biology against them and sticking to the plan, you can handle the problem safely and effectively.
When You Must Call a Professional
Knowing how to safely get rid of a wasp nest often means knowing when not to. While tackling a small, easy-to-reach nest on your own can be tempting, some situations are just too risky. Overconfidence is the number one reason a manageable pest problem turns into an emergency room visit.
Recognizing your limits is the smartest thing you can do. Certain red flags should immediately tell you to step back and call in a professional. It's about understanding the high stakes involved when you're dealing with a mature, defensive colony.
Nests in Structural Voids
If you've spotted wasps disappearing into a tiny hole in your siding, a gap near the foundation, or an opening into the attic, the game has completely changed. Nests built inside walls, soffits, attics, or crawl spaces are an immediate sign to call for help.
Spraying an aerosol can into a wall void is a recipe for disaster. You’ll rarely get the whole colony, and you'll often force angry, panicked wasps to find another way out—which is usually right into your living room. A pro has specialized gear, like insecticidal dusters with long nozzles, to treat these hidden nests without pushing the problem deeper into your home.
Large or Aggressive Colonies
The size of the nest is a huge indicator of risk. A small, umbrella-shaped paper wasp nest with a dozen visible wasps is one thing. A grey, papery nest the size of a basketball or a buzzing underground yellowjacket hive is a completely different beast.
Any nest larger than your fist should be considered a job for a licensed technician. A mature colony can house thousands of aggressive wasps, and they will swarm to defend their home with overwhelming force.
Underground nests are especially dangerous. You often have no idea how massive the colony is until it's too late. Accidentally disturbing one while mowing the lawn can lead to hundreds of painful stings in seconds.
Personal Health and Allergy Risks
This is the most critical red flag of all, and it is non-negotiable. If you or anyone in your household has a known allergy to bee or wasp stings, you must never attempt to remove a nest yourself. Anaphylactic shock can be fatal, and it’s a risk that is simply not worth taking.
Even if you don't have a known allergy, receiving multiple stings can cause a severe toxic reaction. Your safety and the well-being of your family should always come first.
The Cost of Professional Wasp Removal
Many homeowners hesitate to call a professional because they're worried about the cost, but it's important to weigh that against the very real risks. While prices can vary, professional wasp nest removal is an investment in safety. For example, a small, accessible nest might cost a few hundred dollars to remove, but a complex job involving a large nest inside a wall could be significantly more.
Ultimately, that cost covers much more than just the removal. It buys you peace of mind, access to specialized equipment, and the guarantee that the job will be done safely and correctly. For serious infestations or hard-to-reach nests, calling a professional is the only smart move. It can be helpful to learn more about finding qualified pest control professionals to ensure you hire a reputable company.
If any of these situations sound familiar, the safest and most effective solution is to contact a licensed expert. Our team is equipped to handle these high-risk scenarios, and you can learn more about our professional wasp and pest control services to see how we can protect your home.
Proactive Wasp Prevention Strategies
Let's be honest, finding a full-blown wasp nest is stressful. The best way to deal with wasps is to convince them never to move in at all. It really comes down to a simple, proactive approach that makes your property a lot less appealing to queen wasps searching for a new home in the spring.
You just have to take away the two things they need most: shelter and food.
This isn't about spending every weekend on difficult yard work. It’s more of a seasonal rhythm—a few key tasks of inspection and maintenance that can dramatically lower your chances of getting a wasp problem later in the summer.
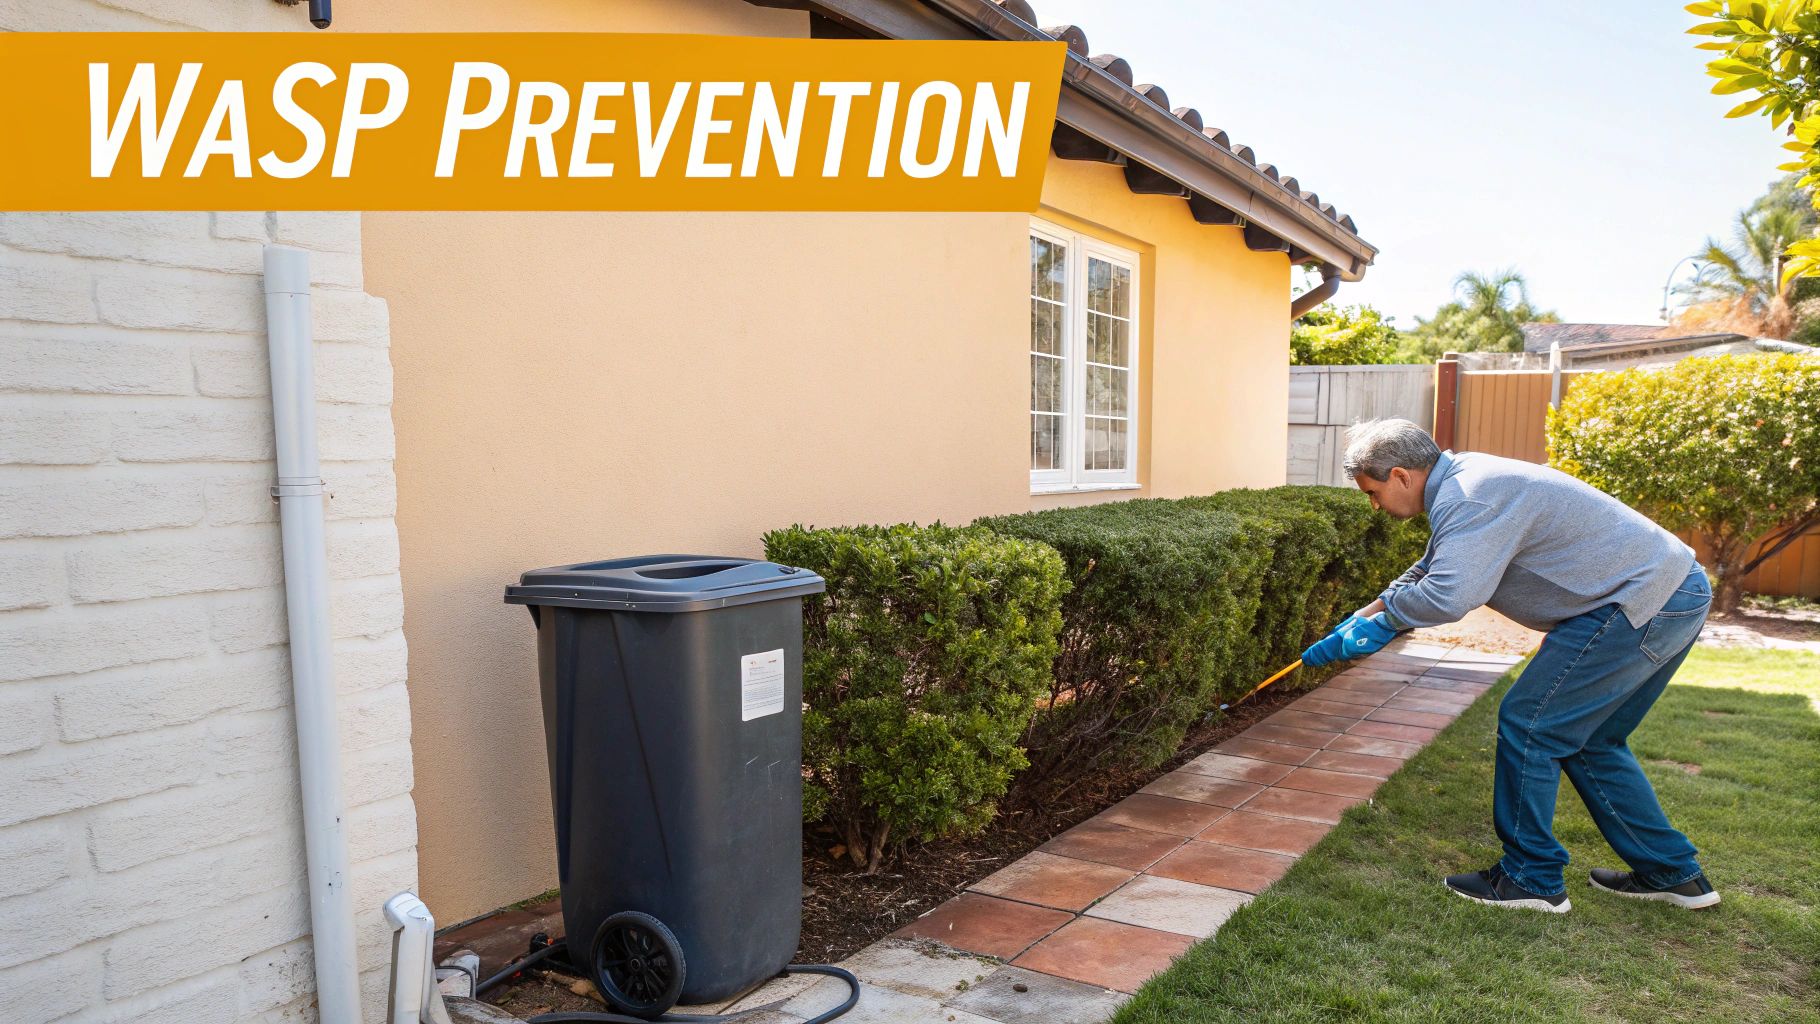
Make Your Home’s Exterior a No-Go Zone
Wasps are master opportunists, always hunting for a quiet, protected spot to build their colony. Your job is to walk your property and seal off every potential construction site before they find it. A quick tour in early spring, before wasps get really active, is the perfect time to spot these vulnerabilities.
Try to think like a wasp. Where would you feel safe from wind, rain, and predators?
- Seal Entry Points: Grab a tube of good exterior caulk and fill in cracks around window frames, door frames, and any spots where utility lines enter your home. Don't forget to check for cracks in the foundation or siding.
- Repair Screens: A tiny tear in a window or door screen is a wide-open door for a wasp. Go over them carefully and patch up even the smallest holes to keep them out of your house, garage, and shed.
- Secure Vents and Openings: Cover dryer vents, attic vents, and soffits with fine mesh screening. It’s a simple fix that blocks access without hurting your home's airflow.
A small tube of sealant and a roll of screen mesh are two of the most powerful tools in your wasp prevention arsenal. Spending an hour on these simple repairs in May can save you from a major headache in August.
Eliminate Wasp Food and Water Sources
Wasps are constantly on the hunt for food, especially anything with protein or sugar. Your backyard can quickly become their favourite restaurant if you're not careful. If you manage these resources, you'll encourage them to buzz off and find an easier meal somewhere else.
This means securing any potential food and cutting off easy access to water. Wasps need both to thrive, so cutting off their supply chain is a very effective deterrent.
Your Seasonal Prevention Checklist
Staying on top of wasp prevention is much easier when you have a straightforward, season-by-season plan. Here’s a practical checklist that works well for us here in Alberta.
Spring (April – May)
- Initial Inspection: Walk around your property and look for those small, golf-ball-sized starter nests. Check under eaves, in sheds, and on porch ceilings. At this stage, they're easy to knock down from a safe distance before the colony gets big.
- Structural Repairs: This is the ideal time to seal those cracks and fix your screens before the wasps really get going.
- Clean Up Debris: Rake up old leaves and move any woodpiles away from your house. These spots are perfect for overwintering queens to hide.
Summer (June – August)
- Manage Garbage: Always keep your outdoor garbage and recycling bins sealed tight. A lid that's even slightly ajar is an open invitation for foraging wasps.
- Clean Up Spills: Be quick to clean up any food or drink spills on your deck or patio, especially sugary drinks, fruit, and meat scraps.
- Limit Water Sources: Fix leaky outdoor taps and get rid of any sources of standing water.
By making these steps part of your yearly routine, you’re not just stopping one nest—you’re building a long-term defence. For an even more detailed guide on making your yard less inviting, check out our complete guide on how to prevent wasp nests for more expert tips. This consistent effort is the real key to enjoying a wasp-free summer.
Common Wasp Removal Questions Answered
Even with a solid plan, it's natural to have a few questions buzzing around your head when you're getting ready to tackle a wasp nest. Knowing what to do in a "what if" scenario and busting a few common myths is a huge part of doing this safely. Here are the answers to some of the most common questions we get from homeowners.
What Should I Do If I Get Stung?
First thing's first: if a wasp gets you, your immediate priority is to calmly and quickly move away from the nest. Don't swat, don't flail. A single sting can release an alarm pheromone that basically tells every other wasp in the colony to come after you. Panicking just makes you a bigger target.
Once you’re safely away, take a look at the sting. If you can see the stinger still in your skin, scrape it out sideways with a credit card or your fingernail. Whatever you do, don't try to pull it out with tweezers or your fingers—that can actually squeeze more venom into the wound.
After that, wash the area well with soap and water, then apply a cold pack to help with the pain and swelling. An over-the-counter antihistamine can help with any itching. However, if you start showing signs of a severe allergic reaction—like trouble breathing, your face or throat swelling up, dizziness, or hives all over—call 911 immediately. That's a life-threatening medical emergency.
Is It Safe to Just Knock a Nest Down With a Hose?
Please, don't do this. Blasting a wasp nest with a high-pressure hose is one of the most dangerous and ineffective things you can do. It might seem like a quick and easy solution, but all you're really doing is making the entire colony incredibly angry.
The water will wreck the nest, sure, but it won't kill the wasps. Instead, you'll have a furious swarm erupting from the damaged nest, and guess who their primary target will be? This approach dramatically increases your odds of getting stung multiple times and doesn't actually solve the problem.
For any nest bigger than a golf ball, a proper treatment is the only safe way to go. Water isn't the right tool for this job.
Does Leaving an Old Wasp Nest Deter New Ones?
This is a really common myth, but unfortunately, it’s just not true for the social wasps we deal with here in Alberta. Species like yellowjackets, hornets, and paper wasps never reuse an old nest from a previous season.
Every spring, a new queen comes out of hibernation and starts a brand new colony from scratch. That old, grey, abandoned nest from last year offers zero deterrent. In fact, if the spot was good enough for one nest, a new queen might just decide to build her new home right beside the old one.
Leaving up an old nest doesn't prevent new ones. It’s always best to knock down old, inactive nests in the late fall or winter. This cleans up the area and gets rid of a potential hiding spot for other pests like spiders or beetles.
Are There Natural Ways to Get Rid of a Wasp Nest?
A few non-chemical methods get passed around, but their effectiveness is questionable at best, and they can be pretty risky.
- Smoke: Some people try smoking out an aerial nest with a barbecue or a small fire. This is an enormous fire hazard, especially near a house or shed, and we absolutely do not recommend it.
- Soap and Water: A spray bottle filled with soapy water can kill individual wasps by clogging their breathing pores. The problem is, you have to completely drench every single wasp, which means getting dangerously close. It's only remotely feasible for the tiniest, newly started nests.
- Traps: You can buy or make wasp traps, and they're decent for cutting down on the number of foragers buzzing around your patio. But traps will never eliminate the nest. The queen stays safe inside, laying more eggs and creating more workers.
While these "natural" options might seem appealing, they often fail and put you at a high risk of getting stung. For most active nests, a targeted insecticide spray—used correctly—is the most reliable and safe DIY approach when the situation allows for it.
If you're looking at a wasp problem that feels too big or too risky to handle yourself, don't hesitate. Your family's safety is what's most important. For professional, guaranteed wasp removal in Red Deer and across Alberta, contact the experts at Dragon Pest Control. We have the right gear and experience to solve your problem quickly and safely. Book your service with us today!