

That quiet scratching you hear in the dead of night? It’s probably not your house just "settling." More often than not, it's the classic first sign you have mice in walls. These tiny intruders treat the spaces between your drywall as their own private highway system, building nests and causing damage long before you ever lay eyes on one. Catching these early warnings is your best defence.
Figuring Out if You Have Mice in Your Walls
It’s easy for homeowners here in Red Deer and across central Alberta to shrug off the initial clues. Many people think a single mouse isn't a big deal, but what you don't see is the real problem. Seeing one mouse is often a sign of a much larger, hidden colony already thriving inside your home.
Mice are incredibly fast breeders, and the insulated voids in your walls are the perfect nursery for their population to explode without you ever knowing.
The issue escalates fast because your walls provide everything a mouse could want: safety from predators, warmth from your insulation, and a short commute to food sources in your kitchen. They don't just pass through; they set up shop, creating complex nests and runways that turn your home's structure into their personal playground.
Early Warning Signs of Mice in Walls
Not sure what to look for? This table breaks down the key signs that mice have moved into your walls.
| Sign Type | What to Look (or Listen) For | Common Locations in a Home |
|---|---|---|
| Auditory Clues | Scratching, scurrying, or faint squeaking sounds, mostly at night. You might also hear a soft, persistent gnawing on wood or wires. | Inside walls near the kitchen, behind appliances, in the attic, or anywhere sounds can echo through ductwork. |
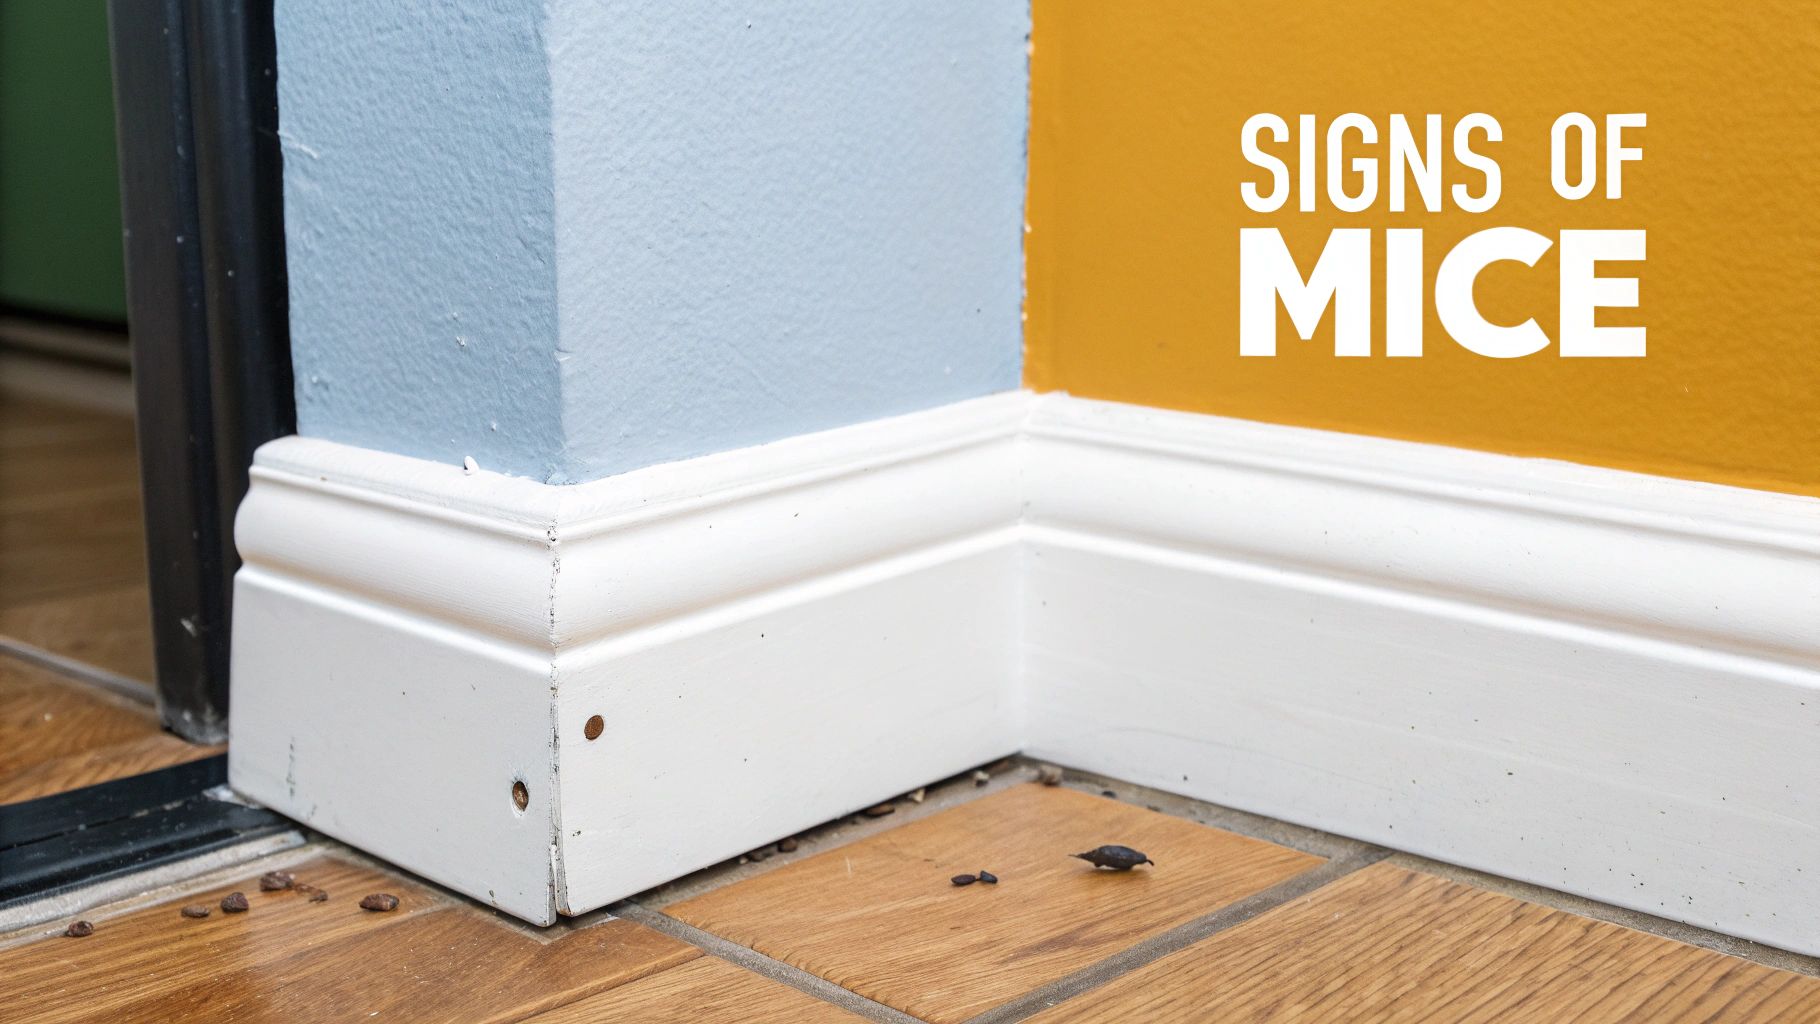
| Physical Evidence | Small, dark, rice-shaped droppings; greasy rub marks along baseboards; shredded paper, insulation, or fabric for nesting. | Along baseboards, in dark corners of pantries or cupboards, under sinks, behind the fridge or stove, and in the attic. |
| Odour | A persistent, stale, ammonia-like or musty smell that you can't trace to any other source. The odour gets stronger over time. | Strongest near the main nesting area, often concentrated around a specific wall, outlet, or section of the basement. |
Being able to spot these signs early gives you a major advantage in stopping a small problem before it becomes a full-blown infestation.
Listening for Night-Time Activity
The most common clue is sound, but it can be tricky to pinpoint. Since mice are nocturnal, you’re most likely to hear them when your house is quiet and dark.
Tune your ears for these specific noises:
- Scratching or Scurrying: This is the classic sound of tiny feet running along the inside of drywall or on top of wires.
- Gnawing or Chewing: A faint but steady chewing sound could be mice gnawing on wooden studs, electrical wiring, or even plastic pipes.
- Squeaking: Tiny squeaks and chirps are how mice communicate. Hearing this often means there's a nest with young mice nearby.
A common mistake is misjudging the location. Sounds often travel through heating ducts, making it seem like the mice are in the ceiling when the nest is actually in a first-floor wall. You’ll need to listen carefully over a few nights to get a better sense of where they are.
Looking for Physical Proof
Besides what you hear, mice always leave a trail of physical evidence behind. A quick inspection with a flashlight along baseboards, behind appliances, and in the back of cupboards can tell you a lot.
Here’s a key detail: mice are creatures of habit. They stick to the same routes over and over, creating visible "runways." These paths are your single best clue for figuring out where to focus your traps and baits.
Keep an eye out for greasy, dark smudges along walls and floorboards. We call these rub marks, and they’re caused by the dirt and oils from a mouse’s fur rubbing against surfaces as it scurries along. The darker the mark, the heavier the traffic on that route.
Droppings are another dead giveaway. Mouse droppings are small and rod-shaped with pointed ends, looking a bit like dark grains of rice. Fresh ones are dark and soft, while older droppings are grey and will crumble if you touch them. Finding these is a sure sign you have an active problem.
Think about this: in just six months, one pair of mice can eat over two kilograms of food and leave behind roughly 18,000 droppings inside your home. It shows just how fast a "small" issue can turn into a serious health and sanitation nightmare. If you're not sure what you're seeing, our guide can help you learn the difference between mice and rats.
Don't Ignore Strange Smells
Finally, trust your sense of smell. If you notice a persistent, stale odour like ammonia that you can't pin on the garbage or a plumbing issue, it’s very likely you're smelling a large mouse nest. This distinct, musty scent comes from the buildup of their urine and droppings, and it will be strongest right near their main nesting site. If that smell is concentrated around a specific wall or even an electrical outlet, you've probably found their home base.
Why Your Alberta Home Is a Prime Target for Mice
To really get a handle on stopping mice, you have to think like one. What makes your house so appealing? For us here in Alberta, the answer is usually right outside the window. Our dramatic seasons put immense pressure on local wildlife, and your home starts looking like a five-star resort.
When that first hard frost hits Red Deer, mice are faced with a pretty simple choice: find good shelter, or they won't make it through the winter. They aren't being picky. They're just trying to survive. Your insulated walls are a paradise compared to the frozen, predator-filled world outside.
It's not just about the warmth, either. Your house is the full package. It’s a fortress against predators like owls and neighbourhood cats, and it's almost always close to food—kitchen crumbs, the dog's food bowl, or that bag of birdseed you forgot about in the garage.
The Seasonal Invasion Pattern
The big trigger for a mouse problem is always the weather. As soon as those autumn temperatures start to dip, mice kick into high gear, scrambling to find their winter home. This is why so many people in central Alberta start hearing that first faint scratching in the walls around October and November.
This seasonal push is becoming a bigger and bigger problem across the province. For example, Edmonton's mouse infestations have exploded, with some reports showing a 65% increase in residential call-outs. That's a massive jump, and it shows just how aggressively these pests are trying to get indoors during the colder months. You can see more on this trend and what it means for Alberta pest management here.
Once they're in, they rarely have a reason to leave. Your walls become a network of safe, climate-controlled highways, letting them travel between their nest and your kitchen without ever being seen.
What Makes a House Vulnerable?
Not every home is an easy target. Certain things can basically roll out the welcome mat for mice, and knowing your home's weak spots is the first step in building a solid defence.
Here are a few of the biggest vulnerabilities I see all the time:
- Tiny Entry Points: It’s true what they say—a mouse can squeeze through a hole the size of a dime. Gaps around utility pipes, small cracks in the foundation, and unsealed vents are the most common culprits.
- Clutter Around the Foundation: A woodpile stacked against the house, overgrown bushes, or even just some storage bins give mice the perfect cover to explore your home's exterior without being spotted.
- Attached Garages: Garages are often the weak link. They're usually not sealed as well as the rest of the house and often store attractants like grass seed or garbage cans, making them the perfect staging area for a full-blown invasion.
The moment you start thinking like a mouse, you see your own property in a whole new light. Every little gap becomes a potential doorway. Every cluttered corner is a safe hiding spot. This is the mindset you need for effective, long-term pest control.
Shifting your focus from just reacting to noises to actively searching for and sealing these weak points is the single most important thing you can do. And while many animals slow down in the winter, mice certainly don't. You can learn more about their cold-weather habits in our article on whether mice hibernate. It really drives home why sealing up your house before the first snowfall is so critical to keeping mice out of your walls for good.
Alright, you've confirmed there are mice in your walls. That scratching sound isn't just your imagination, and it's definitely unsettling. The key now is to act fast and smart to get them out. This isn't about just tossing a few traps around; it's about getting inside a mouse's head and beating them at their own game.
Since they’re using the spaces behind your drywall as their personal highway system, your plan has to cut them off at the pass. Forget about the middle of the room—you need to focus on the edges, the baseboards, and the hidden routes where they feel safe.
Why Poison Is a Terrible Idea for In-Wall Problems
Before we even get into trapping, let's clear something up: do not use poison baits for mice in your walls. I can't stress this enough. It might seem like the easy way out, but it's a mistake that can make the problem ten times worse.
Here’s what happens: the mouse eats the bait, feels sick, and retreats to its nest deep inside the wall cavity to die. Now you have a rotting carcass you can't reach. The smell is unbelievable and can linger for weeks, sometimes months, seeping into your living space. It's a truly awful odour that's nearly impossible to get rid of.
Worse yet, that dead mouse becomes a buffet for other pests. You’ll be trading a mouse problem for a secondary infestation of flesh flies, carpet beetles, and other insects. Trust me, it’s not a trade you want to make. Trapping is the only reliable way to handle mice inside walls.
Choosing the Right Trap for the Job
Not all traps are created equal, especially when you're dealing with a hidden infestation. The best choice depends on your comfort level and whether you have curious kids or pets running around.
-
Classic Snap Traps: The old reliable. They’re cheap, they work, and when set correctly, they provide a quick dispatch. But for an in-wall issue, their success is all about placement. A trap in the open is useless; it has to be right up against the baseboard along their known travel path.
-
Electronic Traps: These are a great modern option. The mouse enters, gets a high-voltage shock, and it’s over instantly. They are fully enclosed, making them a much safer bet in homes with pets or small children. A little light usually blinks to let you know you've made a catch, so you don't have to keep checking visually.
-
Live-Catch Traps: If you’d rather not kill the mice, these are for you. But they come with a big responsibility. You must check them daily, because a mouse can die from stress and dehydration if left too long. You also need to release it far, far away—at least 3-5 kilometres from your home, otherwise it’ll be back before you are.
Pro Tip: Don't rely on just one trap. Mice can become "trap shy," especially after they see a fellow mouse get caught. Mix it up by using a few different types, like snap and electronic, to catch even the most cautious ones.
Comparing Mouse Removal Methods for In-Wall Infestations
Choosing the right tool is critical when dealing with pests you can't see. Each method has its pros and cons, especially when the infestation is hidden behind drywall. This table breaks down the most common approaches.
| Method | Effectiveness for Walls | Safety Concerns (Pets/Kids) | Risk of Odour/Secondary Pests |
|---|---|---|---|
| Snap Traps | High (with correct placement) | Moderate (exposed mechanism) | Low |
| Electronic Traps | High | Low (enclosed design) | Low |
| Live-Catch Traps | Moderate (requires daily checks) | Low | Low |
| Poison Baits | Low (creates bigger problems) | High (toxic) | Very High |
As you can see, trapping methods are overwhelmingly superior for in-wall issues, eliminating the risk of hidden carcasses and the foul odours that come with them.
The Art of Strategic Trap Placement
The real secret to trapping isn’t the bait—it's the location. Mice are creatures of habit. They stick to the same routes along walls and baseboards every single time. Your job is to put your traps right in their path.
Look for those greasy rub marks and tiny droppings we talked about earlier. Place your traps perpendicular to the wall, with the trigger or opening facing the baseboard. This setup intercepts the mouse as it scurries along its usual route, forcing it to cross the trap.
And don't be shy with the numbers. For a single suspected runway, set several traps about a metre apart. This dramatically increases your chances of a quick catch. Check your traps every day, and always wear gloves when handling them and any captured mice to protect yourself. If you're looking for more in-depth strategies, our complete guide on how to get rid of mice has even more detail.
Finally, let’s talk bait. Peanut butter is a classic for a reason—it’s sticky and aromatic. But if mice have access to other food in your house, they can get picky. Don't be afraid to try a few different things. A small piece of chocolate, a bit of cotton for nesting material, or a dab of hazelnut spread can be just the thing to lure them in.
How to Find and Seal Every Mouse Entry Point
Getting the mice out of your walls is a huge win, but the job’s only half done. If you don't find and seal up every tiny gap they used to get in, a new group of mice will simply follow the old scent trails and move right back in. This is the most important step—it's what shifts you from constantly fighting infestations to actually preventing them for good.
To truly fortify your home, you have to start thinking like a mouse. Forget looking for obvious, gaping holes. You're hunting for vulnerabilities no bigger than a dime, because that’s all a mouse needs to squeeze its body through. This means getting hands-on with a methodical inspection of your home’s entire exterior, from the foundation right up to the roof.
This visual guide breaks down the basic process of taking your home back from these pests.
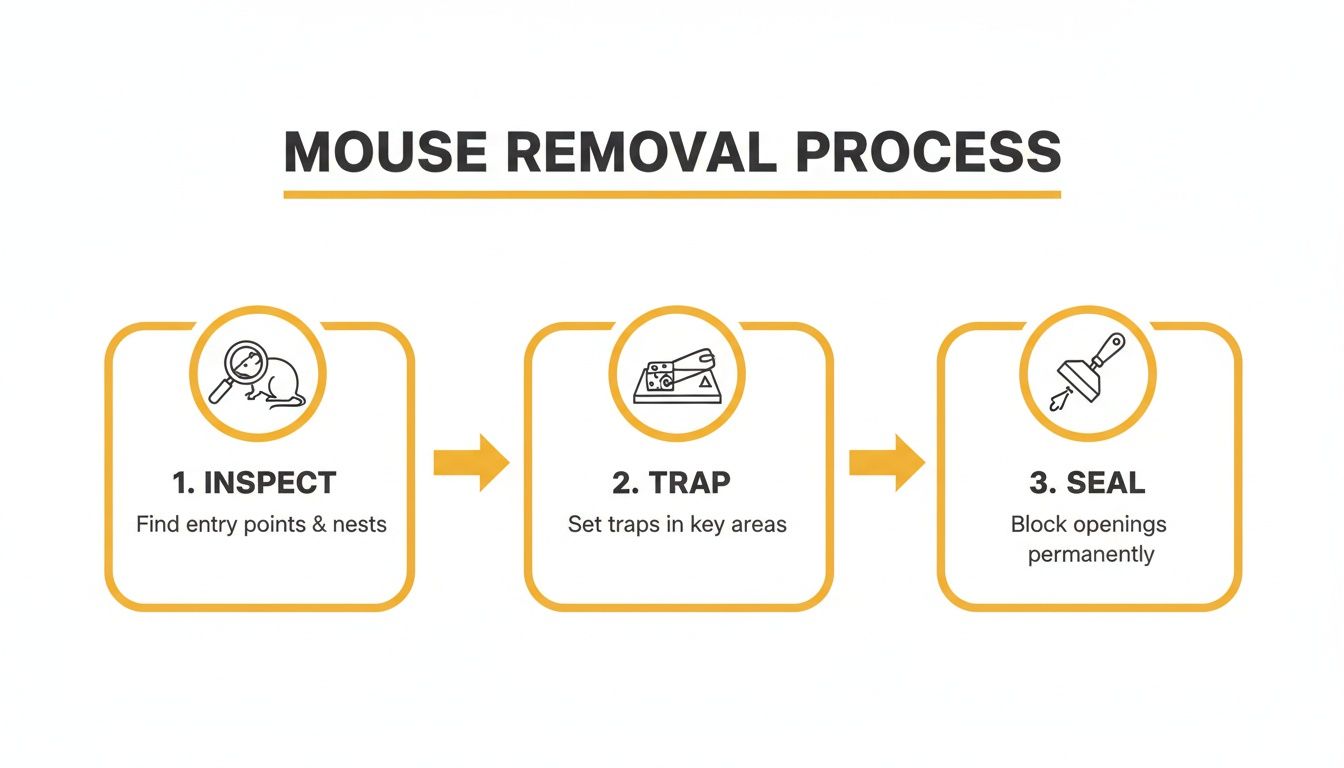
As you can see, trapping is just one piece of the puzzle. A thorough inspection and proper sealing are just as vital if you want long-term success.
Conducting Your Perimeter Inspection
Grab a good flashlight—even if it's broad daylight—and get ready to get up close and personal with your home's exterior. You're looking for any gap where different building materials connect or where utilities enter the house. These spots are basically highways for mice.
Be sure to pay extra close attention to these high-risk areas:
- Utility Penetrations: Check where gas lines, electrical conduits, outdoor taps, and HVAC pipes go into your home. The hole drilled for the pipe is almost always bigger than the pipe itself, leaving a perfect, round entryway.
- Foundation and Siding: Get down low and inspect the entire base of your home where the foundation meets the siding. You're looking for cracks, gaps, or any spot where the siding has warped or pulled away.
- Vents and Weep Holes: Dryer vents, attic vents, and the little weep holes in brick siding should all be covered. A sturdy, fine wire mesh will block rodents without blocking airflow.
- Corners and Joints: The outside corners where siding panels meet, along with the frames around your windows and doors, are notorious for developing small gaps mice can wiggle through.
While you're sealing these obvious points, don't forget about the structure itself. For instance, addressing foundation cracks is critical for cutting off hidden pathways. To us, it’s a tiny fissure in the concrete; to a mouse, it's an open invitation.
Choosing the Right Sealing Materials
Once you've mapped out all the weak spots, you need to plug them with materials that mice can't simply chew through. This is where a lot of DIY efforts fail—using the wrong filler is just a waste of your time.
Mice will make short work of wood, plastic, vinyl, rubber, and even cheap caulking. The goal is to use something that will dull their teeth and make them give up and move on.
For a permanent solution, you'll want to use a few different materials together to block, fill, and seal every opening.
Essential Mouse-Proofing Supplies
| Material | Best Use Case | Why It Works |
|---|---|---|
| Steel Wool or Copper Mesh | Stuffing small holes and gaps around pipes before you seal them. | Mice absolutely hate chewing on metal. The abrasive feel is a powerful deterrent against their sensitive teeth. |
| Expanding Foam Sealant | Filling larger cracks and voids after you've packed them with steel wool. | It expands to create a solid, airtight seal, but mice can chew through it if you use it alone. The steel wool is the real barrier. |
| Hardware Cloth (Wire Mesh) | Covering bigger openings like vents, soffits, or gaps under a deck. | This is a sturdy metal grid that allows air to flow but physically stops rodents from getting through. |
| High-Quality Caulk/Sealant | Applying the final, weatherproof layer over smaller cracks and filled gaps. | It gives you a clean, durable finish that also keeps out moisture and smaller insects. |
The trick is to use these materials as a team. For a gap around a pipe, you would first pack the hole tightly with coarse steel wool. Next, you’d spray expanding foam over it to lock the wool in place and create that airtight seal. This two-layer approach ensures the entry point is both filled and completely chew-proof. Taking the time to do this right turns your home from an easy target into a fortress, protecting you from future problems with mice in walls.
Safely Cleaning and Sanitizing After an Infestation

So, the last trap has been sprung and the scratching in the walls has finally gone quiet. It’s a huge relief, but don't put your feet up just yet. The next job is one of the most important: the cleanup. Mice leave a nasty trail of droppings, urine, and nesting debris that can be a serious health hazard long after they're gone.
This isn’t your average weekend tidy-up. Mouse waste can carry some nasty pathogens, like the bacteria that causes salmonellosis and, in rare but serious cases here in Alberta, Hantavirus. The real danger comes from disturbing dried droppings or urine, which can kick those particles into the air. That’s why using the right safety gear is absolutely non-negotiable.
Your Safety Protocol Before You Begin
Before you even think about starting, you need to gear up properly. This is all about protecting yourself from the contaminants left behind by mice in walls, attics, and other hidden spots.
Your essential safety kit needs to include:
- Disposable Gloves: Always wear rubber, latex, or vinyl gloves to avoid any direct contact with waste.
- A Respirator Mask: A simple dust mask won't cut it. You need an N95-rated respirator to properly filter out any airborne particles.
- Eye Protection: Safety glasses or goggles are a must to protect your eyes from splashes and airborne debris.
Once you’re geared up, your first move is to air out the space. Open up all the windows and doors and let the area ventilate for at least 30 minutes before you start cleaning. This simple step helps disperse any contaminated dust and drastically lowers the risk of breathing in anything harmful.
Cleaning Contaminated Surfaces and Materials
Whatever you do, do not sweep or vacuum dry mouse droppings. It's the most common mistake people make, and it’s the quickest way to launch dangerous particles right into the air you’re breathing.
Instead, start by soaking any visible droppings and urine stains with a good commercial disinfectant or a bleach solution (a mix of one part bleach to ten parts water works great). Let that solution sit for a solid five minutes to kill off any pathogens. After it has soaked, you can safely wipe up the mess with paper towels and toss them into a sealed plastic bag for disposal.
Remember, the goal is to disinfect, not just clean. After removing the initial waste, go back over all surfaces—floors, countertops, baseboards, and inside cupboards—with your disinfectant solution to ensure the area is fully sanitized.
Dealing with contaminated insulation inside your walls is a bit trickier. If you found a nest inside a wall cavity, any insulation that's been heavily soiled or shredded needs to go. Treat it like hazardous waste: wear your full safety gear, spray it down with disinfectant to minimize dust, and bag it up securely before throwing it out.
Finally, you'll need to deal with that lingering odour. It’s common to have a musty smell after clearing out mice from the walls. Enzyme-based cleaners are fantastic for breaking down the organic proteins in urine that cause the stink. For really stubborn odours, try placing a few bowls of white vinegar or activated charcoal around the room to absorb what's left. Staying on top of a regular cleaning schedule can prevent pests from seeing your home as an easy target in the first place—it's worth knowing how often you should really be cleaning. This final sanitization step ensures your home isn’t just mouse-free, but truly safe and healthy again.
Here’s the rewritten section, designed to sound like it was written by an experienced human expert, following the provided style guide and examples.
Knowing When to Call a Pest Control Professional
DIY methods can be surprisingly effective for a minor mouse issue, but there’s a definite tipping point where a stubborn problem becomes a job for a professional. It’s a call many homeowners in Red Deer end up making after their own efforts just can’t stop the scratching in the walls.
Knowing the signs that you’re in over your head can save you a ton of time, money, and frustration down the road.
One of the clearest red flags is the sheer scale of the infestation. If you’re hearing constant activity from multiple walls or even on different floors, you’re not dealing with one or two mice—you’ve likely got a large, well-established colony. A strong, persistent musty odour that hangs around even after you’ve cleaned is another sure sign the nests are large and deeply embedded in your home’s structure.
When DIY Just Isn't Cutting It
Sometimes, the problem is just too complex for the simple solutions you can grab at the hardware store. Professionals come equipped with commercial-grade tools and techniques that are far more advanced than what’s available to the public.
Think of these scenarios as clear signals that it’s time to pick up the phone:
- You’re finding signs of structural damage. Chewed electrical wires aren't just an annoyance; they're a serious fire hazard. Gnawed plumbing can lead to hidden leaks and water damage, and shredded insulation means your home is losing heat and money.
- Your own trapping efforts are failing again and again. If mice are consistently stealing bait or avoiding your traps altogether, you're probably dealing with a "trap-shy" population that needs a more strategic approach.
- The problem comes back every single year. A recurring infestation is a sure sign you haven’t found and sealed all the entry points. A pro can conduct a thorough inspection to find and block every last crack and crevice.
A professional pest control technician doesn’t just get rid of the mice you have now. They solve the underlying issues that allowed them in, giving you a real, long-term solution.
The Professional Advantage in Alberta
Dealing with mice inside walls requires a very specific skill set. Since the 1950s, Alberta has run a world-famous Rat Control Program, but that success has almost no bearing on mice. In fact, mice remain a persistent and growing challenge right across the province, demanding specialized attention. You can explore Alberta's invasive species history to get a better sense of this unique situation.
A licensed technician can bring in advanced tools, like thermal imaging cameras, to pinpoint nests without having to tear your drywall apart. They use commercial-grade products and proven exclusion techniques to make sure the problem is resolved safely and completely, protecting both your family and your property.
Still Have Questions About Mice in Your Walls?
Even after you've tackled a mouse problem, it's natural to have some lingering questions. A lot of homeowners I talk to in the Red Deer area have the same concerns, so let's clear up a few common myths and realities about what happens when mice move into your walls.
One of the biggest hopes people have is that the mice will just pack up and leave on their own once spring arrives. I wish I could say they do, but that's almost never the case. While the cold weather might push them inside initially, once a mouse family sets up a nest in your walls, they’ve found a five-star hotel. It’s safe, warm, and close to a food source (your kitchen). They have zero reason to move out.
Can Mice Actually Chew Through Drywall?
You bet they can. It's not their first choice of material, but if a mouse needs to get from point A to point B—or create a new shortcut to a food source—a sheet of drywall isn't going to stop them. If you’re seeing small, mysterious holes near your baseboards, that’s a classic sign they’re busy with some interior renovations of their own.
Another thing to remember is that just because you hear them in the walls doesn't mean that's where they're living exclusively. Mice use the space between your studs like a highway system. Their actual nests could be tucked away in attic insulation, a quiet corner of the basement, or even an old box of stored clothes. The scratching you hear is often just their daily commute.
The most important thing to understand is that plugging a single hole won't solve your problem. If the main nest is still active, those mice are incredibly persistent. They will either find another way out or simply chew a new one.
And finally, what about those ultrasonic repellents you see online? A lot of people ask if they can just plug one in and call it a day. In my experience, these devices have very little real-world impact. Mice might be startled by the sound for a day or two, but they get used to it quickly. When you have a confirmed infestation, proper trapping and exclusion are the only methods that are actually proven to work.